Copilot Studio Agent Hooks
Connect FireGuard to Microsoft Copilot Studio with a custom connector and topic YAML.
Microsoft Copilot Studio does not use local shell hooks. FireGuard runs inside Copilot Studio topic flows through a Power Platform custom connector and copied topics.
Use this integration when you want FireGuard to check Copilot user messages before the dialog continues and check assistant output before it is returned.
Prerequisites
- A FireGuard API key.
- A FireGuard project ID.
- Access to the target Power Platform environment.
- Permission to create custom connectors and edit Copilot Studio topics.
Flow Overview
Download Files
Use these files while following the steps below:
Download OpenAPI spec
Input Guardrail YAML
Output Guardrail YAML
LLM Client YAML
Conversation Start YAML
Agent Hooks GitHub repository
1. Download the OpenAPI Spec
Download the Fireraven connector specification file. You will use this file when creating the custom connector in Copilot Studio.
2. Pick the Power Platform Environment
- Go to
https://admin.powerplatform.microsoft.com/manage/environments. - Select the environment where you want to integrate the Fireraven Copilot guardrails.
3. Create the Custom Connector in Copilot Studio
- Go to
https://copilotstudio.microsoft.com/. - Make sure the selected environment is the one you selected in step 2.
- In the left menu, open Tools.
- Click New tool and select Custom connector.
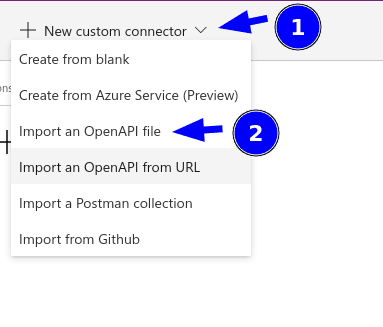
- In the top right of the page, click New Custom Connector and select Import an OpenAPI file.
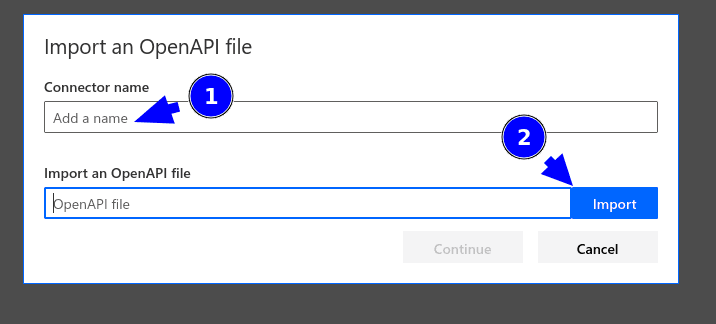
- Choose a name for the connector.
- Upload the OpenAPI spec file you downloaded in step 1.
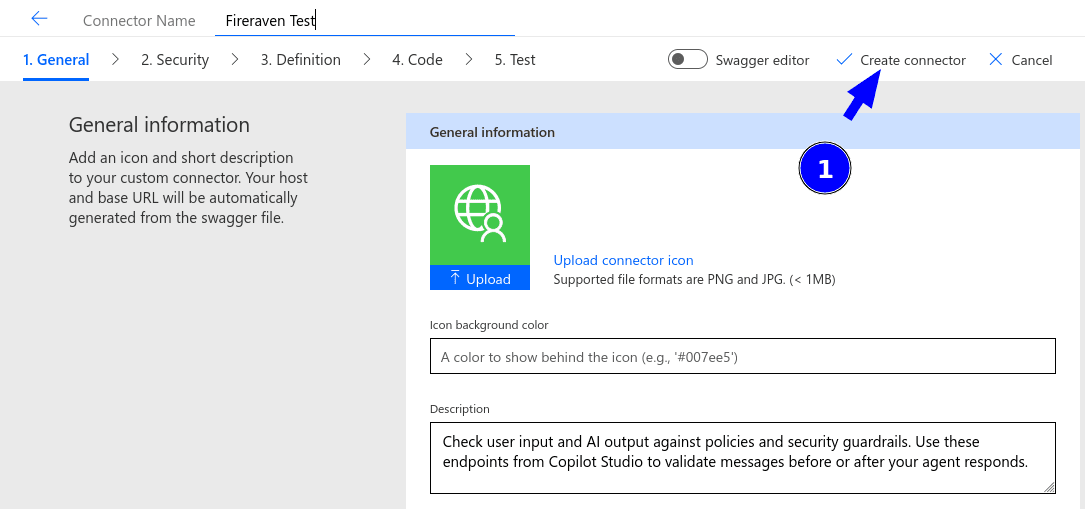
- After the popup closes, click Create connector in the top right.
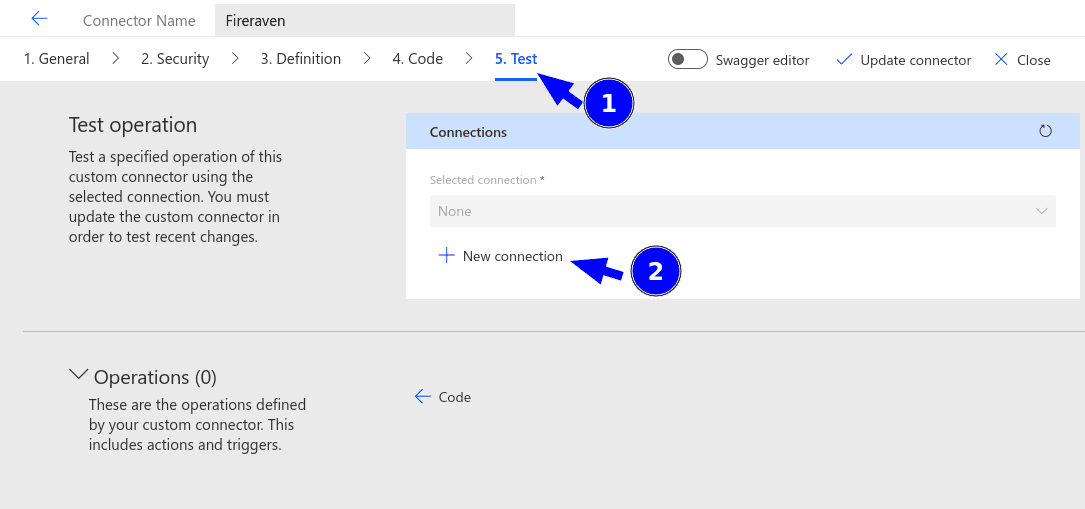
- Open step 5. Test. If you only see a General dropdown, open it and select Test.
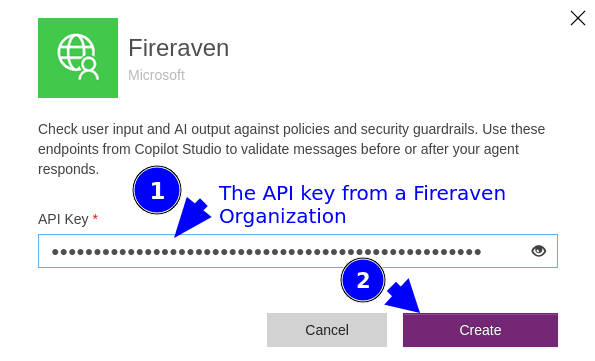
- Click New connection.
- Enter the FireGuard API key from your organization settings.
- Click Create.
4. Create a Blank Agent
- Return to
https://copilotstudio.microsoft.com/. - In the side menu, select Agents.
- In the top-right corner, click Create blank agent.
5. Clean Up Default Topics
- In your new agent, go to the Topics tab.
- Remove all default custom topics so you start from a clean slate.
While you edit topics, Copilot Studio may show temporary errors in the editor as you paste code. You can ignore those until all topics are created and saved.
6. Add the Fireraven Input Guardrail Topic
- In your agent, go back to the Topics tab.
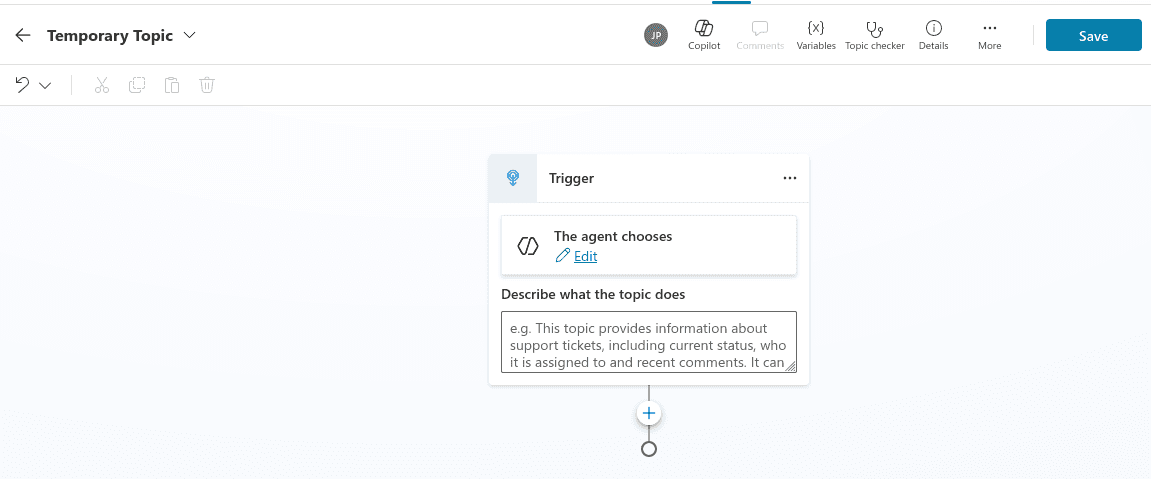
- Click + Add a topic → From blank.
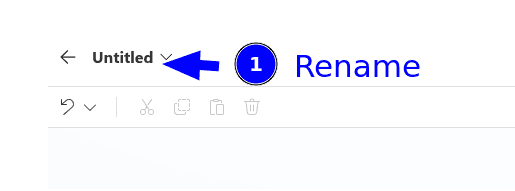
- Rename the topic to Fireraven Input Guardrail.
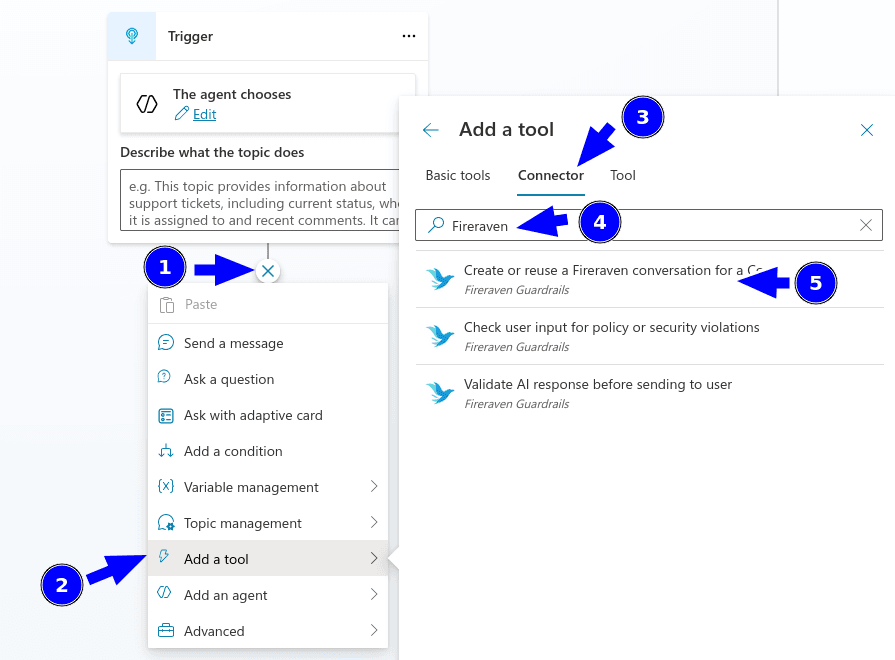
- Click the + below the trigger.
- Select Add a tool.
- Select Connector.
- Search for Fireraven.
- Select Create or reuse a Fireraven conversation for a Copilot Studio conversation.
- Click Submit.
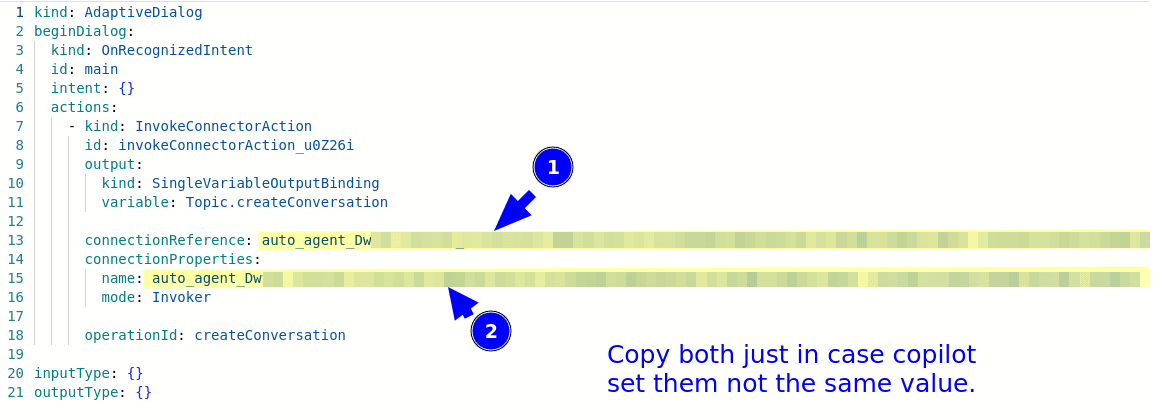
- Click More and select Open code editor.
- Copy the value for
connectionReferenceand keep it for the placeholders below. - Copy the value for
connectionProperties.nameand keep it for the placeholders below. - Replace
PROJECT_ID FROM FIRERAVENwith your FireGuard project ID. - Replace
TO BE REPLACED WITH THE CORRECT CONNECTOR REFERENCEwith the copiedconnectionReference. - Replace
TO BE REPLACED WITH THE CORRECT CONNECTOR PROPERTIES NAMEwith the copiedconnectionProperties.name. - Paste the YAML below into the Copilot Studio code editor.
- Click Save. If Copilot Studio says there is an error, ignore it and save anyway.
Download the input guardrail YAML
kind: AdaptiveDialog
beginDialog:
  kind: OnActivity
  id: main
  type: Message
  actions:
    - kind: InvokeConnectorAction
      id: invokeConnectorAction_E20NJG
      input:
        binding:
          conversation_copilot_id: =System.Conversation.Id
          description: testing purposes
          name: Test New Conv From Copilot new Endpoint
          project_id: PROJECT_ID FROM FIRERAVEN

      output:
        kind: SingleVariableOutputBinding
        variable: Topic.createConversationCopilot

      connectionReference: TO BE REPLACED WITH THE CORRECT CONNECTOR REFERENCE
      connectionProperties:
        name: TO BE REPLACED WITH THE CORRECT CONNECTOR PROPERTIES NAME
        mode: Invoker

      operationId: createConversationCopilot

    - kind: ParseValue
      id: DBm2EX
      variable: Global.fireguard_conv_id
      valueType: String
      value: =Text(ParseJSON(Topic.createConversationCopilot).id)

    - kind: InvokeConnectorAction
      id: invokeConnectorAction_H0vAzn
      input:
        binding:
          conversation_id: =Text(ParseJSON(Topic.createConversationCopilot).id)
          guardrails: "=[{type: \"policies_guardrail\"},{type: \"security_guardrail\"}]"
          messages_history: "=Table({ role: \"user\", content: System.LastMessage.Text})"

      output:
        kind: SingleVariableOutputBinding
        variable: Topic.inputGuardrails

      connectionReference: TO BE REPLACED WITH THE CORRECT CONNECTOR REFERENCE
      connectionProperties:
        name: TO BE REPLACED WITH THE CORRECT CONNECTOR PROPERTIES NAME
        mode: Invoker

      operationId: inputGuardrails

    - kind: ParseValue
      id: muPQWR
      variable: Global.input_id
      valueType: String
      value: =Text(ParseJSON(Topic.inputGuardrails).input_request.id)

    - kind: ConditionGroup
      id: conditionGroup_g01LRc
      conditions:
        - id: conditionItem_oHh1sc
          condition: =Not(ParseJSON(Topic.inputGuardrails).is_safe)
          actions:
            - kind: SendActivity
              id: sendActivity_OcHBxd
              activity: Blocked by **Responsible AI Policies.**

            - kind: CancelAllDialogs
              id: wQBjXD

    - kind: BeginDialog
      id: xp70py
      dialog: auto_agent_Dwt5r.topic.LLMClient

inputType: {}
outputType: {}
7. Add the Fireraven Output Guardrail Topic
- In your agent, go back to the Topics tab.
- Click + Add a topic → From blank.
- Rename the topic to Fireraven Output Guardrail.
- Click More and select Open code editor.
- Replace
TO BE REPLACED WITH THE CORRECT CONNECTOR REFERENCEwith the copiedconnectionReference. - Replace
TO BE REPLACED WITH THE CORRECT CONNECTOR PROPERTIES NAMEwith the copiedconnectionProperties.name. - Paste the YAML below into the Copilot Studio code editor.
- Click Save. If Copilot Studio says there is an error, ignore it and save anyway.
Download the output guardrail YAML
kind: AdaptiveDialog
beginDialog:
  kind: OnRedirect
  id: main
  actions:
    - kind: ConditionGroup
      id: conditionGroup_CSj7rn
      conditions:
        - id: conditionItem_97CioU
          condition: =IsBlank(Global.LLM_Output)
          actions:
            - kind: SendActivity
              id: sendActivity_LFifcO
              activity: Blocked by **Responsible AI Policies.**

            - kind: CancelAllDialogs
              id: u8IGDK

    - kind: InvokeConnectorAction
      id: invokeConnectorAction_fjIg91
      input:
        binding:
          conversation_id: =Global.fireguard_conv_id
          guardrails: "=[{type: \"policies_guardrail\"},{type: \"security_guardrail\"}]"
          input_id: =Global.input_id
          output: =Global.LLM_Output

      output:
        kind: SingleVariableOutputBinding
        variable: Topic.outputGuardrails

      connectionReference: TO BE REPLACED WITH THE CORRECT CONNECTOR REFERENCE
      connectionProperties:
        name: TO BE REPLACED WITH THE CORRECT CONNECTOR PROPERTIES NAME
        mode: Invoker

      operationId: outputGuardrails

    - kind: ConditionGroup
      id: conditionGroup_g01LRc
      conditions:
        - id: conditionItem_oHh1sc
          condition: =Not(ParseJSON(Topic.outputGuardrails).is_safe)
          actions:
            - kind: SendActivity
              id: sendActivity_OcHBxd
              activity: Blocked by the **Responsible AI Policies**

            - kind: CancelAllDialogs
              id: fqQHfo

    - kind: SendActivity
      id: sendActivity_tR17f8
      activity: "{Global.LLM_Output}"

    - kind: CancelAllDialogs
      id: CRHsIK

inputType: {}
outputType: {}
8. Add the LLM Client Topic
- In your agent, go back to the Topics tab.
- Click + Add a topic → From blank.
- Rename the topic to LLM Client.
- Click More and select Open code editor.
- Replace
TO BE REPLACED WITH THE CORRECT DIALOG REFERENCEwith the output guardrail dialog reference, for example<connection-prefix>.topic.FireravenOutputGuardrail. - Paste the YAML below into the Copilot Studio code editor.
- Click Save. If Copilot Studio says there is an error, ignore it and save anyway.
kind: AdaptiveDialog
beginDialog:
  kind: OnRedirect
  id: main
  actions:
    - kind: SearchAndSummarizeContent
      id: n9UVwS
      autoSend: false
      variable: Global.LLM_Output
      userInput: =System.LastMessage.Text

    - kind: BeginDialog
      id: uDPQhM
      dialog: TO BE REPLACED WITH THE CORRECT DIALOG REFERENCE

inputType: {}
outputType: {}
9. Edit the Conversation Start System Topic
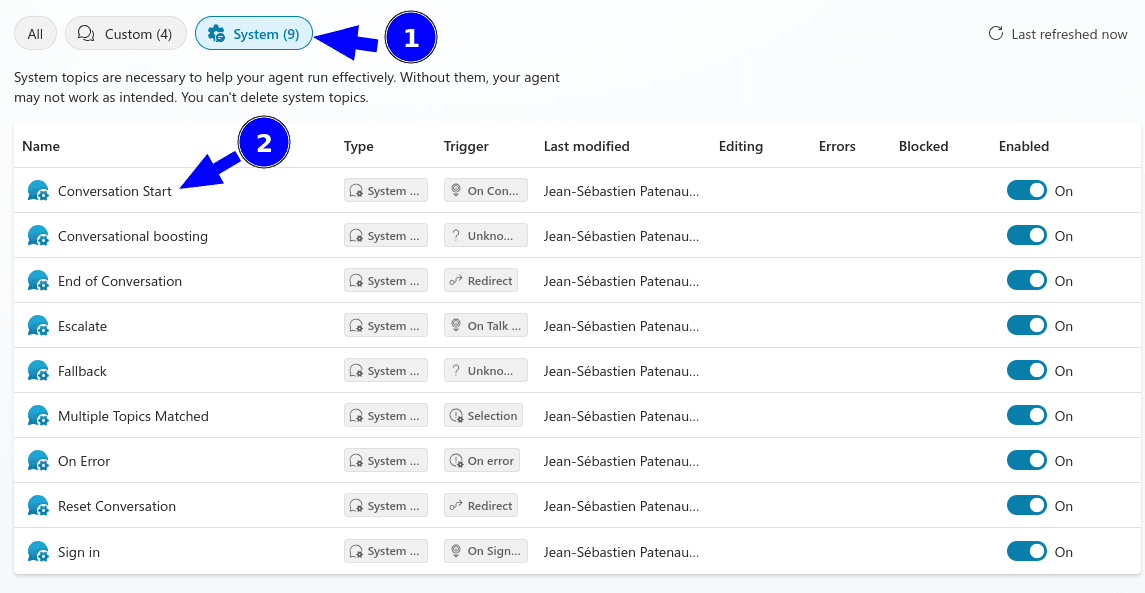
- In your agent, go to the Topics tab and open the System tab.
- Open the Conversation Start topic.
- Click More and select Open code editor.
- Paste the YAML below into the Copilot Studio code editor.
- Click Save. If Copilot Studio says there is an error, ignore it and save anyway.
Download the Conversation Start YAML
kind: AdaptiveDialog
beginDialog:
  kind: OnConversationStart
  id: main
  actions:
    - kind: SendActivity
      id: sendMessage_M0LuhV
      activity:
        speak:
          - Hello and thank you for calling {System.Bot.Name}. Please note that some responses are generated by AI and may require verification for accuracy. How may I help you today?
        attachments:
          - kind: AdaptiveCardTemplate
            cardContent: |-
              {
                "type": "AdaptiveCard",
                "$schema": "https://adaptivecards.io/schemas/adaptive-card.json",
                "version": "1.5",
                "body": [
                  {
                    "type": "ColumnSet",
                    "spacing": "Medium",
                    "columns": [
                      {
                        "type": "Column",
                        "width": "auto",
                        "verticalContentAlignment": "Center",
                        "items": [
                          {
                            "type": "Image",
                            "url": "https://app.fireraven.ai/favicon.ico",
                            "size": "Small"
                          }
                        ]
                      },
                      {
                        "type": "Column",
                        "width": "stretch",
                        "verticalContentAlignment": "Center",
                        "items": [
                          {
                            "type": "TextBlock",
                            "text": "Conversation secured by **[Fireraven](https://fireraven.ai)**",
                            "weight": "Bolder",
                            "color": "Accent"
                          }
                        ]
                      }
                    ]
                  }
                ]
              }
10. Test Your Agent
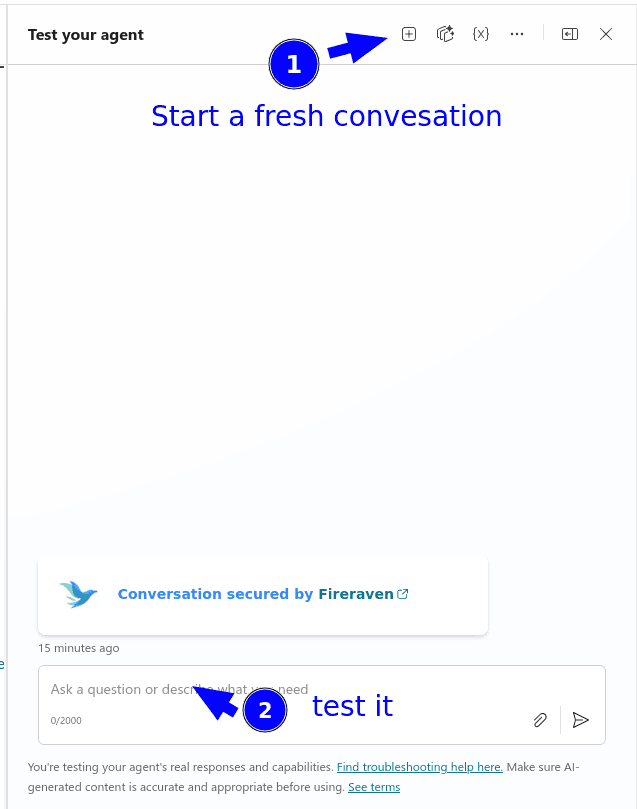
- In Copilot Studio, open Test your agent.
- Start a fresh conversation.
- Run a few prompts to verify that FireGuard checks input and output as expected.
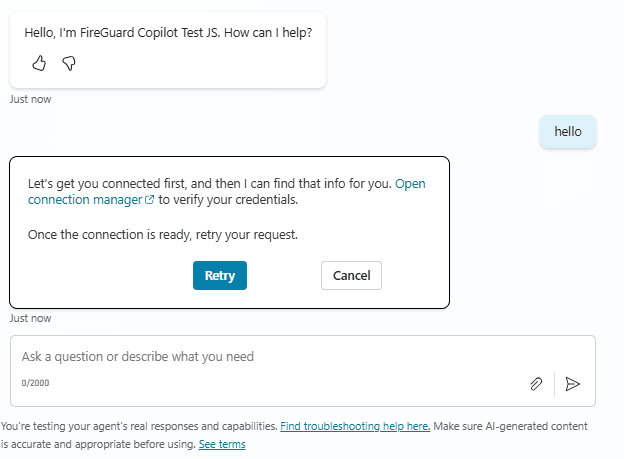
If you see Let's get you connected first..., reconnect the custom connector:
- Click Open connection manager in the error message.
- On Manage your connections, find your Fireraven connector.
- Click Connect.
- Try testing the agent again.
Related API Reference
The Copilot topics call these FireGuard endpoints: